Raspberry Pi SPI Loopback Testing

This post explains how to do SPI loopback testing in RaspberryPi.
This is the pinout of RaspbeyyPi GPIO header.

Next short the MOSI and MISO pins (GPIO10 and GPIO09)

Now download SPI test code from below link

https://raw.githubusercontent.com/raspberrypi/linux/rpi-3.10.y/Documentation/spi/spidev_test.c

Compile it

gcc -o spidev_test spidev_test.c

Run the code using spi dev

./spidev_test -D /dev/spidev0.0

If you are getting the hex characters as shown in screenshot, the SPI loopback is working.

Enabling SPI on Raspberry Pi

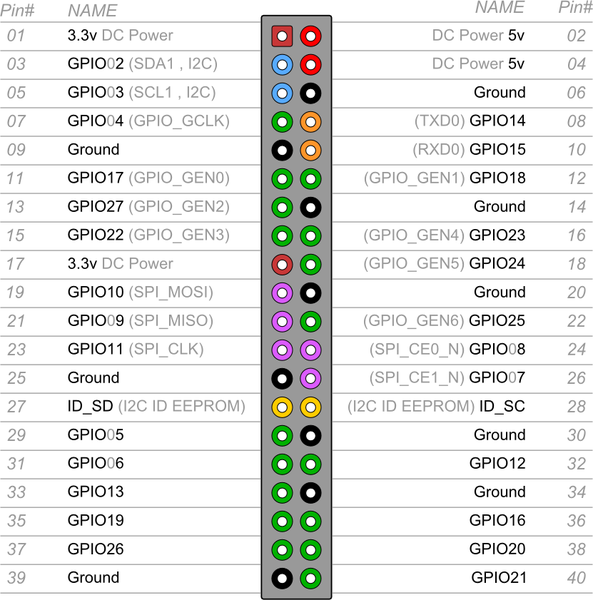
The Serial Peripheral Interface bus (SPI) is a synchronous serial communication interface specification used for short distance communication, primarily in embedded systems. The interface was developed by Motorola.

SPI devices communicate in full duplex mode using a master-slave architecture with a single master. The master device originates the frame for reading and writing. Multiple slave devices are supported through selection with individual slave select (SS) lines.

Read more details on Wikipedia

The SPI bus specifies five logic signals:

SCLK: Serial Clock (output from master).
MOSI: Master Out Slave In (data output from master).
MISO: Master In Slave Out (data output from slave).
SDIO: Serial Data I/O (bidirectional I/O)
SS: Slave Select (often active low, output from master).

I am using RaspberryPi Model B. First i turned on the Pi, i used NOOBS Raspbian operating system (https://www.raspberrypi.org/downloads/noobs/). I don’t have a HDMI display, so i connected it to network found out the ip of the Pi and did ssh using the following command

ssh pi@ip-address

The default password for ssh is “raspberry” if you are using NOOBS debian distro.

The SPI is not enabled by default. To enable SPI issue the following command

sudo raspi-config

Then Select Interfacing Options

Select SPI

It will ask for Enable or Disable, Enable SPI

Finish the config and reboot

After reboot you can see two spidev’s by issuing the command

ls /dev/spi*

This mean SPI is enabled on your Raspberry Pi

Configuring in NO-IP in Raspberry Pi

Raspberry_Pi_Logo

Create an account at no-ip.com and set up a new host/redirect. Set up port forwarding and DDNS on your router.

Download No-Ip client

sudo wget http://www.no-ip.com/client/linux/noip-duc-linux.tar.gz
sudo tar -vzxf noip-duc-linux.tar.gz
cd no-ip-2.1.9-1
sudo make
sudo make install

Create new file in /etc/init.d called noip2

sudo vim /etc/init.d/noip2

#! /bin/sh
### BEGIN INIT INFO
# Provides: testnoip
# Required-Start:
# Should-Start:
# Required-Stop:
# Should-Stop:
# Default-Start:  2 3 4 5
# Default-Stop:   0 1 6
# Short-Description: Test daemon process
# Description:    Runs up the test daemon process
### END INIT INFO

# . /etc/rc.d/init.d/functions	# uncomment/modify for your killproc
case "$1" in
    start)
	echo "Starting noip2."
	/usr/local/bin/noip2
    ;;
    stop)
	echo -n "Shutting down noip2."
	killproc -TERM /usr/local/bin/noip2
    ;;
    *)
	echo "Usage: $0 {start|stop}"
	exit 1
esac
exit 0

Make script executable and run at startup

sudo chmod 755 /etc/init.d/noip2
sudo update-rc.d noip2 defaults

Reboot the rPi

sudo reboot

Happy Hacking 🙂

Raspberry Pi change keyboard layout

Raspberry_Pi_Logo

If different letters appear on-screen from that which you typed, you need to reconfigure you keyboard settings. In Debian, from a command line type:

sudo dpkg-reconfigure keyboard-configuration

Or do it the cli way,From the command line type

sudo nano /etc/default/keyboard

Then find where it says

XKBLAYOUT="gb"

and change the gb to the two-letter code for your country…
Basically almost all indian keyboards are us based so you can change it to US..

You may need to restart for the changes to take effect.

Happy Hacking 🙂